OBDLink SX Manual
The OBDLink SX USB manual is applicable for Windows PC users. This manual will take you through several steps to get the OBDLink SX ready to use, including installing the OBDwiz diagnostic software. The OBDLink SX USB can be found here in our webshop.
Windows PC OBDLink USB manual
Step 1: download the OBDwiz software here and install it. When doing so, follow the indicated steps of the software.
Step 2: Connect the SX USB to the PC or laptop
The LED light will turn yellow when you plug the SX USB into your PC's USB port. If a red LED light comes on, it means the drivers are not installed properly. To install the drivers, click here and choose the driver that matches your Windows version.
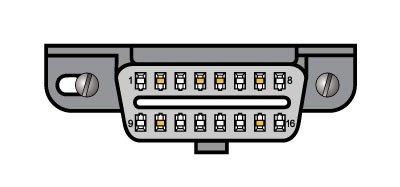
Step 3: Find the OBD2 diagnostic port in your car
The diagnostic port is always found near the steering column of your car. The diagnostic port can be either directly visible or enclosed behind a plastic cover or ashtray. The most common placement for the diagnostic port is under the steering column.
Step 4: Plug the SX USB adapter into your car's diagnostic port
Push the SX USB adapter into your car's diagnostic port. Make sure you push the adapter in straight, without too much force. This prevents you from bending the pins in the adapter.
Step 5: Set your car ignition in the on position, but won't start the car
When the adapter is in the diagnostic port, your you can turn the ignition in the on position. Do not turn on the engine.
- For a car with a manual transmission: put your car on the parking brake and in "neutral" in the transmission. Turn the key to the ignition point (the point before the car actually starts). Your car is now on the ignition. For cars with a keyless go feature (where you do not need to turn a key, but have a start button): do not depress the clutch and press the start button when the car is in 'neutral'.
- For a car with an automatic transmission: put your car on the parking brake and in "P" (park position). Turn the key to the ignition point (the point before the car actually starts). Your car is now on the ignition. For cars with a keyless go feature (where you do not have to turn a key, but have a start button): do not apply the foot brake and press the start button when the car is in the ''P'' position.
Is a yellow LED lit? Check that the cable is connected properly and check for blown fuses.
Step 6: Launch the OBDwiz software on your computer and activate it.
You can start the OBDwiz software from the icon on your desktop, or from the Windows start menu -> programs -> OBDwiz -> OBDwiz. When you first start the software, you will need to activate it.
- Activation is quite simple, namely:
- Connect the interface to your computer
- Launch OBDWiz software
- Connect the OBDLink interface to your car and put the ignition in the on position
- Connect to your car with the OBDWiz software
- When you press "diagnostics" for example, the software will ask for activation, press "yes" to proceed to the activation screen
- On the screen, select the first option "I am a new OBDLink user"
- In the next screen, enter your information
- In the next screen you will get an activation code in the format as you need it with the new software
Step 7: Configure the OBDwiz software on your computer.
Launch the OBDwiz software and click on "Auto Detect" under the "Connection" heading.

OBDwiz will check the COM ports and baud rate and configure itself. When the check is complete, you will see the screen below.

Step 8: Connect to your car.
Click the "Connect" button in the OBDwiz software to connect to your car. OBDwiz will automatically determine your car's communication protocol.
Step 9: Review Data
OBDwiz can diagnose engine trouble codes, display real time data, view emission status and log data. The capabilities can be found on the left side in the OBDwiz menu.